GB/IE GB/IE
GB/IE GB/IE GB/IE GB/IE GB/IE GB/IE GB/IE GB/IE GB/IE GB/IE
GB/IE GB/IE GB/IE GB/IE GB/IE GB/IE GB/IE GB/IE GB/IE GB/IE
GB/IE GB/IE GB/IE GB/IE FIFI FI
FI
Paina SET-painiketta, niin näyttöön ilmestyy
korkein tähän asti mitattu lämpötila (HI).
Paina SET-painiketta uudelleen, niin näyttöön
ilmestyy alin tähän asti mitattu lämpötila (LO).
Pidä SET-painiketta alhaalla painettuna, kun
näytössä näkyy korkein tai alin lämpötila, niin
voit nollata tallennetut arvot.
STPWATCH: ajanottokello
Paina SET-painiketta, kun haluat käynnistää
ajanottokellon.
Paina SET-painiketta uudelleen, kun haluat
pysäyttää ajanottokellon.
Pidä SET-painiketta alhaalla painettuna, niin
voit palauttaa ajanottokellon arvoon 0.
CAL RATE: tämänhetkinen kalorien kulutus
CALORIE: kalorilaskija
Pidä SET-painiketta alhaalla painettuna, niin
voit palauttaa kalorilaskijan arvoon 0.
FAT-BURN: rasvanpoltto grammoina
Pariston nielleen henkilön on hakeuduttava
välittömästi lääkärin hoitoon.
Poista paristo laitteesta, jos laite on pidemmän
aikaa pois käytöstä.
VARO! RÄJÄHDYSVAARA! Älä
koskaan lataa paristoja uudelleen!
VARO! RÄJÄHDYSVAARA!
Vaihda aina kaikki paristot samanai-
kaisesti ja käytä ainoastaan saman-
tyyppisiä paristoja.
Tyhjät paristot on poistettava välittömästi lait-
teesta. Ne voivat vuotaa paristotilaan!
Noudata paristojen sijoittamisessa laitteen
napaisuustietoja!
Säilytä paristot lasten ulottumattomissa. Älä
koskaan heitä niitä tuleen äläkä oikosulje tai
pura niitä!
Jos laitteesi paristo vuotaa, poista se välittömästi
välttääksesi laitteen vaurioitumisen!
FIFI
Problem Solution
Empty LC-display or no
response after putting
the battery in again
RESET
Remove battery. In the
area marked RESET of
the battery compartment,
touch the plus and minus
terminals at the same
time using a screwdriver.
Insert a 3V battery into
the battery compartment
in such a way
that the +
terminal points upwards.
Replace the battery cover
on the battery compart-
ment. The microprocessor
is reset and restarted.
reactivate the computer. The function indicator
8
shows the current mode.
Press the MODE button
11
repeatedly to
page through the various modes.
Press the SET button
13
to change into the sec-
ondary function for any function.
Press the SET button and keep it pressed to call
or reset up any saved values.
The bike computer has the following
functions:
Advanced users’ functions:
CLOCK > TOTALODO > TOTAL-TM >
TRIPDIST >
MAXSPEED
> AVGSPEED > TRIPTIME > TEMP >
STPWATCH >
CAL RATE > CALORIE > FAT-BURN >
KM+/- > TIME+/- > SCAN
Beginners’ functions:
TRIPDIST > AVGSPEED > TRIPTIME
7
LC display
8
Function indicator
9
Secondary function value display
10
Primary function value display
11
MODE button
12
Light button
13
SET button
14
SCAN indicator
15
Servicing interval indicator
16
Speed comparison indicato
r
17
Acceleration / deceleration indicator:
Acceleration – anticlockwise
rotation
Decelerat
ion – clockwise rotation
18
Battery state indicator
Technical data
Battery: 3 V (CR2032 button cell)
GB/IE
FI FI FI FI FI FI FI FI FI
FI
– Odometer (countdown or forwards)
– Total odometer and total cycling time display
– Calories
– Fat-burning
– Scan indicator (functions displayed in
continuous loop)
– Automatic switch to clock mode
– Backlight
Description of parts
1a
Bracket
1b
Bracket cushion plate
2a
Sensor
2b
Sensor battery compartment cover
3
Magnet
4
Cable tie
5
Battery 3 V , type CR2032 button cell
6a
Bike computer
6b
Bike computer’s battery compartment cover
Included items
1 Bike computer
1 Bike computer bracket
1 Magnet
1 Sensor
4 Cable ties
2 Batteries 3 V
, type CR2032 button cell
1 Operating instructions
General safety advice
KEEP ALL THE SAFETY ADVICE AND INSTRUC-
TIONS IN A SAFE PLACE FOR FUTURE REFERENCE!
Children or persons who lack the knowledge or
experience to use the device or whose physical,
sensory or intellectual capacities are limited must
never be allowed to use the device without
supervision or instruction by a person responsible
for their safety. Children must be supervised so
that they do not play with the product.
Please note that the warranty does not cover
damage arising from improper treatment, non-
observance of the operating instructions and
safety advice or unauthorised use.
Safety advice concerning
batteries
RISK OF LOSS OF LIFE!
If batteries are swallowed, it can lead to loss of
life. Seek medical attention if a battery is swal
lowed.
Remove the battery if the product is not to be
used for a long period.
CAUTION! RISK OF EXPLO-
SION! Never recharge single-use
batteries!
CAUTION! DANGER OF EXPLO-
SION! Always replace all batteries
at the same time and only use batte
ries
of the same type.
If the battery is exhausted, remove it from the
device immediately. Otherwise the battery is
more likely to leak.
Make sure you insert the battery the right way
round (polarity).
Keep the battery away from children. Do not
throw the battery into a fire. Never short-circuit
it or take it apart.
If your battery leaks, remove it from the device
immediately to prevent the device from being
damaged.
Do not let the fluid from a leaking battery come
into contact with your skin, eyes or mucous
membranes. In the event of contact with fluid
leaking from a battery, thoroughly flush the
affected area with water and / or seek the
advice of a doctor!
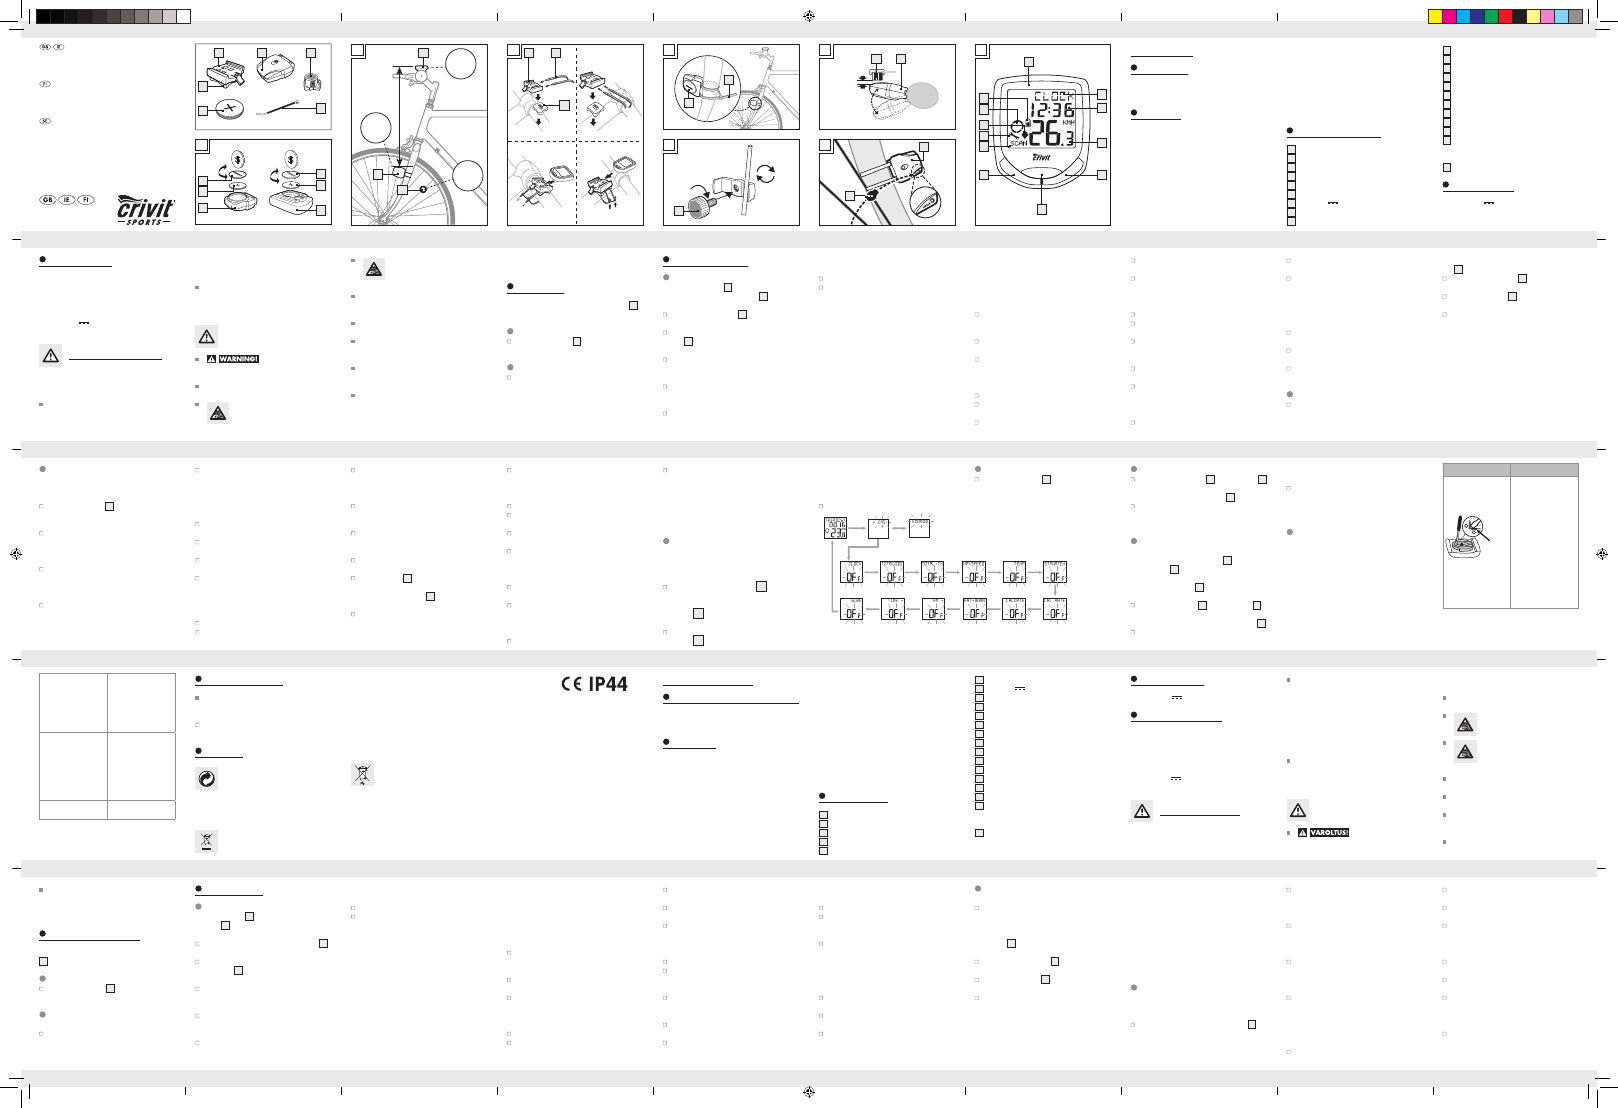
Before use
Remove the protective foil from the LC display
7
before first use.
Inserting the battery
To insert the battery
5
, proceed as shown in
Fig. A.
Attaching the bike computer
To attach the device, proceed as shown in
Figs. B to G.
Preparing for use
Basic settings
Note: The LC display
7
comes on automatically
approx. 2 seconds after the battery
5
is inserted.
You are immediately offered a choice of languages.
Press the MODE-button
11
repeatedly until the
desired language appears.
Confirm your choice by pressing the SET but-
ton
13
. You move on automatically to select
the user profile.
Press the MODE button repeatedly until the
desired
user profile (ADVANCE or EASY)
appears.
Confirm your choice by pressing the SET but-
ton. Now you can choose the wheel size (SET
WS).
A four-digit number appears in the LC display.
Now enter the tyre circumference of your wheel
in mm. Press the MODE button repeatedly until
the desired number appears as the first digit.
Confirm your choice by pressing the SET button.
Repeat this process for each of the three
remaining digits.
Note: You can calculate your tyre
circumference
by multiplying your
tyre diameter by 3.1416.
The following list contains the tyre circumfer
ences
of the most common cycle tyres.
Tyre diameter Tyre circumference
20” 1598 mm
22” 1759 mm
24” 1916 mm
26” (650 A) 2073 mm
26.5” (tubular) 2117 mm
26.6” (700x25C) 2124 mm
26.8” (700x28C) 2136 mm
27” (700x32C) 2155 mm
28” (700B) 2237 mm
ATB24”x1.75 1888 mm
ATB26 x1.4 1995 mm
ATB26 x1.5 2030 mm
ATB26 x1.75 2045 mm
ATB26x2 (650B) 2099 mm
27”x1 2138 mm
27”x1 1 / 4 2155 mm
Now select your desired unit of distance. Press
the MODE button repeatedly until SET KM or
SET MILE appears in the LC display.
Confirm your choice by pressing the SET button.
You move on to entering your age.
A two-digit number appears in the LC display.
Now enter your age. Press the MODE button
repeatedly until the desired number appears
as the first digit.
Confirm your choice by pressing the SET butto
n.
Repeat this process for the remaining digit. You
move on to selecting the unit of weight.
Press the MODE button repeatedly until SET
KG or SET LB appears in the LC display.
Confirm your choice by pressing the SET button.
You move on to entering your weight.
A three-digit number appears in the LC display.
Now enter your weight. Press the MODE button
repeatedly until the desired number appears
as the first digit.
Confirm your choice by pressing the SET button.
Repeat this process for all the remaining digits.
You move on to selecting the time format.
Press the MODE button repeatedly until 12 for
the 12-hour format or 24 for the 24-hour format
appears in the LC display.
Confirm your choice by pressing the SET button.
You move on to setting the time.
A four-digit number appears in the LC display.
Enter the current time. Press the MODE button
repeatedly until the desired number appears
as the first digit.
Confirm your choice by pressing the SET button.
Repeat this process for all the remaining digits.
You move on to selecting the servicing interval.
Press the MODE button repeatedly until the
desired
number of units of distance to your next
in
tended bicycle service appears in the LC
display.
Note: You have the choice of 200, 400, 600
or 800 km or miles.
Confirm your choice by pressing the SET button.
You move on to selecting the unit of temperature.
Press the MODE button repeatedly until °C or
°F appears in the LC display.
Confirm your choice by pressing the SET button.
You have now completed the the basic settings.
Using the bike computer
Note: If the bike computer remains unused for
more than 5 minutes, it automatically switches
into the stand-by mode. Press any button to
Using functions
Note: All the functions and secondary functions
are described in the following list.
CLOCK: - Displays the time
Press the SET button
13
and keep it
pressed for
3 seconds to access the time settings.
TOTALODO: - Total odometer
Press the SET button and keep it pressed for
3seconds to access the wheel size settings
and total distance.
TOTAL-TM: Total time cycling
Press the SET button and keep it pressed for
3seconds to make changes to the saved total
time cycling.
TRIPDIST: Trip distance
Press the SET button and keep it pressed for
3seconds to reset the trip distance, the
average speed and the trip time displays to 0.
MAXSPEED: Highest speed
Press the SET button and keep it pressed for
3seconds to reset the maximum speed display
to 0.
AVGSPEED: Average speed
TRIPTIME: Trip time
TEMP: Thermometer
Press the SET button and keep it pressed to
switch between °C and °F.
Press the SET button to display the highest tem-
perature (HI) measured so far.
Press the SET button again to display the low-
est temperature (LO) measured so far.
Press and hold down the SET button while the
highest or lowest temperature is displayed to
switch back to the current temperature to
reset the saved data.
STPWATCH: Stopwatch
Press the SET button to start the stopwatch.
Press the SET button again to stop the stop-
watch.
Press the SET button and keep it pressed to
reset the stopwatch to 0.
CAL RATE: Current calorie consumption
CALORIE: Calorie meter
Press the SET button and keep it pressed to
reset the calorie counter to 0.
FAT-BURN: Fat burning in grams
Press the SET button and keep it pressed to
reset the fat burning value to 0.
KM: Odometer
Press the SET button and keep it pressed to
change the odometer settings.
The LC display
7
shows the symbol for count-
ing forwards or
backwards (+ or - respectively).
Press the MODE button
11
repeatedly until the
desired symbol is shown.
Confirm your choice by pressing the SET button.
You move on to setting the distance on the
odometer.
A 5-digit number appears in the LC display. En
ter
the desired distance. Press the MODE button
repeatedly until the desired number appears
as the first digit.
Confirm your choice by pressing the SET button.
Repeat this process for all the remaining digits.
TIME: Timer
Press the SET button and keep it pressed to
change the timer settings.
The LC display shows the symbol for counting
forwards or backwards (+ or - respectively).
Press the MODE button repeatedly until the
desired symbol is shown.
Confirm your choice by pressing the SET button.
You move on to the time settings of the timer.
A 5-digit number appears in the LC display.
Enter the desired time. Press the MODE button
repeatedly until the desired number appears
as the first digit.
Confirm your choice by pressing the SET button.
Repeat this process for all the remaining digits.
SCAN: Scan
Note: The scan mode automatically switches
between the trip distance, highest speed, average
speed and trip time displays.
Note: Refer to the section on “Basic settings” to
see how you make or change settings.
CUSTOMIZE mode
Apart from the ADVANCE and EASY mode, you
can make your individual adjustments in the
CUSTOMIZE mode (see procedure).
Press and hold the light button
12
to enter the
CUSTOMIZE mode.
Note: By repeatedly pressing the MODE
button
11
, you can toggle between the
ADVANCE and EASY modes.
In the EASY mode, press and hold the SET
button
13
. Press the MODE button to switch
the settings on or off (e.g. time). Choose „On“,
to add the chosen adjustment to the EASY
modes. Choose „Off“, if you do not want to
add the adjustments.
Press the SET button, to confirm your entry.
Using the backlight
Press the light button
12
to switch on the back-
light temporarily. The backlight automatically
extinguishes after a short period.
Resetting the bike computer
Press the MODE button
11
and SET button
13
at the same time and keep them pressed until
{{----}} appears in the LC display
7
.
Now press the MODE button and keep it
pressed. This resets all the settings.
Note: All stored data will be deleted.
Changing the battery
Note: The battery of the bike computer must be
replaced when the battery symbol
18
appears on
the LC display
7
.
Note: The battery of the sensor must be replaced
when the speed symbol
17
of the LC display can
no longer or hardly be seen when riding the bicycle.
Press the MODE key
11
and the SET key
13
at the same time and keep them pressed until
the {{-----}} symbol appears in the LC display
7
.
To replace the battery, proceed as shown in
figure A. Make sure you fit the battery the right
way round (polarity). This is shown inside the
battery compartment.
Press the SET key and keep it pressed to return
to normal operating mode.
Note: Once the batteries are removed, all stored
data will be erased after approx. 20 seconds.
Troubleshooting
Note: This device has delicate electronic compo-
nents. Therefore interference may occur when it is
near devices which transmit radio signals.
- If errors occur in the display, remove any such
devices from the vicinity of the product. In the case
of such malfunctions, remove the battery briefly and
then reinsert again.
Speed or distance are
not displayed.
Adjust magnet and
sensor correctly.
- Check that the battery
is inserted with the
poles arranged the
right way round.
Display is black The ambient temperature
is too high or the bicycle
computer was exposed
to direct sunlight for too
long. Remove appliance
from direct sunlight and
let it cool off for a while.
The LC-display shows
irregular symbols.
Remove battery and
replace it again.
Cleaning and care
Do not use any liquids or cleaning agents for
cleaning. Otherwise there is a risk of damaging
the device.
The device should only be cleaned on the out-
side with a soft dry cloth.
Disposal
The packaging is wholly composed of
environmentally friendly materials that
can
be disposed of at a local recycling centre.
Contact your local refuse disposal authority for more
details of how to dispose of your worn-out product.
In the interest of the environment, do not
throw out your product with your house-
hold refuse. Take it to a suitable centre
where it can be disposed of properly.
Your local council will be able to tell you
where the collection centres are located
and their opening times.
Defective or exhausted batteries mu
st be recycled
in accordance with Directive 2006 / 66 / EC
. Return
the batteries and / or the device through the appro-
priate collection facilities.
Improper disposal of batteries
can damage the environment!
Batteries must not be disposed of with the house-
hold refuse. They may contain toxic heavy metals
and require to be handled as special waste. The
chemical symbols of heavy metals are: Cd = cad-
mium, Hg = mercury, Pb = lead For this reason,
you must dispose of discarded batteries at a com-
munal disposal centre.
EMC
Polkupyörätietokone
Määräysten mukainen käyttö
Tämä tuote on tarkoitettu polkupyörätietokoneeksi.
Ei kaupalliseen käyttöön.
Toiminnot
– Valikon kielet: GB, DE, FR, NL, IT, ES
– Kello
– Ajanottokello
– Lämpötilanäyttö °C / °F
– Muistitoiminto matalinta ja korkeinta lämpötilaa
varten
– Ajonopeuden näyttö (0–99,9 km / h)
– Keskiarvonopeuden näyttö (0–99,9 km / h)
– Huippunopeuden näyttö (0–99,9 km / h)
– Nopeusvertailu
– Kiihdytys- ja hidastusnäyttö
– Ajoaika-ajastin (maks. 9:59:59) (lähtölaskenta
tai eteenpäin laskeva)
– Kilometrimittari (lähtölaskenta tai eteenpäin
laskeva)
– Kokonaiskilometrimäärän tai kokonaisajoajan
näyttö
– Kalorilaskija
– Rasvanpolttonäyttö
– Scan-näyttö (kaikki toiminnot näytetään
vuorotellen)
– Päältäkytkentäautomatiikka
– Taustavalaistus
Osien kuvaus
1a
Pidike
1b
Pidikkeen pehmuste
2a
Anturi
2b
Anturin paristolokeron kansi
3
Magneetti
4
Kaapelinpidin
5
Paristo 3 V , tyyppi CR2032 nappiparisto
6a
Polkupyörätietokone
6b
Paristolokeron kansi
7
LC-näyttö
8
Toimintonäyttö
9
Kakkostoiminnon arvon näyttö
10
Päätoiminnon arvon näyttö
11
MODE-painike
12
Valo-painike
13
SET-painike
14
SCAN-näyttö
15
Huoltovälinäyttö
16
Nopeudenvertailunäyttö
17
Kiihdytys- ja hidastusnäyttö:
Kiihdytys – käännä vastapäivään
Hidastus – käännä myötäpäivään
18
Paristojen näyttö
Tekniset tiedot
Paristo: 3 V (CR2032 nappiparisto)
Toimituksen sisältö
1 polkupyörätietokone
1 polkupyörätietokoneen pidike
1 magneetti
1 anturi
4 kaapelipidikettä
2 paristoa 3 V
, tyyppi CR2032 nappiparisto
1 käyttöohje
Yleiset turvaohjeet
SÄILYTÄ KAIKKI TURVA- JA KÄYTTÖOHJEET
MYÖS MYÖHEMPÄÄ TARVETTA VARTEN!
Lapset tai henkilöt, jotka kokemattomuutensa tai
tietämättömyytensä takia eivät ole kykeneviä
käyttämään laitetta tai jotka ovat on fyysisesti
tai henkisesti vammautuneita tai heidän aistinsa
ovat rajoittuneita, eivät saa käyttää laitetta ilman
valvontaa tai ilman, että heidän turvallisuudes-
taan vastuussa oleva henkilö on opastanut
heidät laitteen käyttöön. Lasten ei saa antaa
leikkiä tuotteen kanssa.
Huomaa, että takuut eivät koske tapauksia, joissa
laitetta on käsitelty asiattomasti, käyttö- tai tur-
vaohjeita on laiminlyöty tai laite on joutunut
vääriin käsiin.
Paristojen turvaohjeet
HENGENVAARA!
Paristojen nieleminen voi olla hengenvaarallista.
Vältä iho-, silmä- ja limakalvokosketusta. Jos
pariston happoa happoa joutuu iholle, huuhtele
kyseinen kohta runsaalla määrällä vettä ja / tai
ota yhteys lääkäriin!
Ennen käyttöönottoa
Poista ennen ensimmäistä käyttöönottoa LC-näytön
7
suojakalvo.
Paristojn sisäänasettaminen
Aseta paristo sisään
5
kuvan A osoittamalla
tavalla.
Polkupyörätietokoneen
kiinnittäminen
Kiinnitä laite paikoilleen kuten kuvissa B - G on
esitetty.
Käyttöönotto
Perussäädöt
Ohje: Kun paristo
5
on asetettu sisään, kytkeytyy
LC-näyttö
7
n. 2 sekunnin kuluttua automaattisesti
päälle. Pääset suoraan valitsemaan kielen.
Paina MODE-painiketta niin monta kertaa
11
,
kunnes haluttu kieli ilmestyy näyttöön.
Vahvista tekemäsi syöttö painamalla SET-
painiketta
13
. Laite siirtyy automaattisesti
käyttöprofiilin valintaan.
Paina MODE-painiketta niin monta kertaa,
kunnes haluttu käyttöprofiili (ADVANCE) tai
(EASY) ilmestyy näyttöön.
Vahvista valintasi painamalla SET-painiketta.
Laite siirtyy nyt renkaiden koon valintaan
(SET WS).
LC-näyttöön ilmestyy nelinumeroinen luku. Ilmoita
renkaidesi ympärysmitta millimetreinä. Paina
MODE-painiketta niin monta kertaa, kunnes
haluttu luku ilmestyy ensimmäisenä numerona
näyttöön.
Vahvista valintasi painamalla SET-painiketta.
Toista tämä jokaisen kolmen seuraavan numeron
kohdalla.
Ohje: Voit laskea pyörien ympärysmitan kerto-
malla pyörien halkaisijan luvulla 3,1416. Seuraa-
valta listalta löydät tavallisimpien pyörien
ympärysmitat.
Pyörän halkaisija Pyörän
ympärysmitta
20” 1598 mm
22” 1759 mm
24” 1916 mm
26” (650 A) 2073 mm
26,5” (Tubular) 2117 mm
26,6” (700x25C) 2124 mm
26,8” (700x28C) 2136 mm
27” (700x32C) 2155 mm
28” (700B) 2237 mm
ATB24”x1,75 1888 mm
ATB26 x1,4 1995 mm
ATB26 x1,5 2030 mm
ATB26 x1,75 2045 mm
ATB26x2 (650B) 2099 mm
27”x1 2138 mm
27”x1 1 / 4 2155 mm
Valitse seuraavaksi haluamasi pituusmittayksikkö.
Paina MODE-painiketta niin monta kertaa, kunnes
SET KM tai SET MILE ilmestyy LC-näyttöön.
Vahvista valintasi painamalla SET-painiketta.
Seuraavaksi laitteeseen syötetään ikä.
LC-näyttöön ilmestyy kaksinumeroinen luku.
Syötä nyt ikäsi. Paina MODE-painiketta niin
monta kertaa, kunnes haluttu luku ilmestyy
ensimmäisenä numerona näyttöön.
Vahvista valintasi painamalla SET-painiketta.
Toista tapahtuma seuraavaa numeroa varten.
Nyt laite siirtyy painomittayksikön valintaan.
Paina MODE-painiketta niin monta kertaa,
kunnes SET KG tai SET LB ilmestyy LC-näyttöön.
Vahvista valintasi painamalla SET-painiketta.
Nyt laite siirtyy painotietoihin.
LC-näyttöön ilmestyy kolminumeroinen luku.
Syötä nyt painosi tähän. Paina MODE-paini-
ketta niin monta kertaa, kunnes haluttu luku
ilmestyy ensimmäisenä numerona näyttöön.
Vahvista valintasi painamalla SET-painiketta.
Toista tämä kaikkien seuraavien numeroiden
kohdalla. Nyt laite siirtyy aikajärjestelmän
valintaan.
Paina MODE-painiketta niin monta kertaa,
kunnes LC-näyttöön ilmestyy luku 12 12 tunnin
järjestelmää tai 24 24 tunnin järjestelmää varten.
Vahvista valintasi painamalla SET-painiketta.
Nyt laite siirtyy kellonajan säätöön.
LC-näyttöön ilmestyy nelinumeroinen luku. Syötä
nyt oikea kellonaika. Paina MODE-painiketta
niin monta kertaa, kunnes haluttu luku ilmestyy
ensimmäisenä numerona näyttöön.
Vahvista valintasi painamalla SET-painiketta.
Toista tämä kaikkien seuraavien numeroiden
kohdalla. Nyt laite siirtyy huollon aikavälin
valintaan.
Paina MODE-painiketta niin monta kertaa,
kunnes näyttöön ilmestyy haluamasi kilometri-
määrä, jonka jälkeen pyöräsi pitäisi huoltaa
seuraavan kerran.
Huomautus: Valittavana on 200, 400, 600
ja 800 km tai mailia.
Vahvista valintasi painamalla SET-painiketta.
Nyt laite siirtyy lämpötilayksikön valintaan.
Paina MODE-painiketta niin monta kertaa,
kunnes °C tai °F ilmestyy LC-näyttöön.
Vahvista valintasi painamalla SET-painiketta.
Perusasetukset on nyt tehty.
Polkupyörätietokoneen
käyttö
Huomautus: Jos polkupyörätietokonetta ei
käytetä 5 minuuttiin, se kytkeytyy automaattisesti
valmiustilaan. Painamalla mitä tahansa paini-
ketta tietokone aktivoituu uudelleen. Toiminto-
painike
8
näyttää, missä tilassa tietokone on
juuri nyt.
Paina MODE-painiketta
11
uudelleen, jotta
voit selailla eri tilojen välillä.
Paina SET-painiketta
13
, jotta voit vaihtaa
jokaisen toiminnon alatoimintoon.
Pidä SET-painiketta alhaalla painettuna, kun
haluat katsella tallennettuja arvoja tai nollata ne.
Polkupyörätietokoneessa on seuraavat
toiminnot:
Edistyneille tarkoitetut toiminnot:
CLOCK > TOTALODO > TOTAL-TM >
TRIPDIST >
MAXSPEED
> AVGSPEED > TRIPTIME > TEMP >
STPWATCH >
CAL RATE > CALORIE > FAT-BURN >
KM+/- > TIME+/- > SCAN
Aloittelijoille tarkoitetut toiminnot:
TRIPDIST > AVGSPEED > TRIPTIME
Toimintojen käyttäminen
Huomautus: Seuraavassa listassa on kuvattu
kaikki toiminnot ja alatoiminnot.
CLOCK: - kellonajan näyttö
Pidä SET-painiketta alhaalla painettuna
13
3sekunnin ajan, niin voit säätää kellonajan.
TOTALODO: - ajettu kilometrimäärä
Pidä SET-painiketta alhaalla painettuna 3sekun-
nin ajan, niin voit säätää renkaan koon ja ajetun
kilometrimäärän.
TOTAL-TM: kokonaisajoaika
Pidä SET-painiketta alhaalla painettuna 3 sekun-
nin ajan, niin voit tehdä muutoksia kokonaisajo-
aikaan.
TRIPDIST: päivän aikana ajettu kilometrimäärä
Pidä SET-painiketta alhaalla painettuna 3sekunnin
ajan, niin voit palauttaa ajetun kilometrimäärän,
keskinopeuden ja ajoajan arvoon 0.
MAXSPEED: maksiminopeus
Pidä SET-painiketta alhaalla painettuna 3sekunnin
ajan, niin voit palauttaa maksiminopeuden
arvoon 0.
AVGSPEED: keskinopeus
TRIPTIME: ajoaika
TEMP: lämpömittari
Pidä SET-painiketta alhaalla painettuna, niin
voit valita lämpöasteikon °C ja °F välillä.
Z31433
C D
E
F
G
ca. 70 cm
Fig. C
Fig. D
Fig. E
B
A
H
6b
5
6a
4
32a1a
1b
5
2b
5
2a
6a
2a
3
1a 4
1b
2a
4
3
3
2a3
2a
8
7
14
9
10
11
12
13
15
16
17
18
Bike Computer
Proper use
The product is intended for use as a cycle computer.
Not for commercial use.
Functions
– Menu languages: GB, DE, FR, NL, IT, ES
– Clock
– Stopwatch
– Temperature °C / °F
– Memory function for min. and max. temperature
– Current speed (0–99.9 km / h)
– Mean speed (0–99.9 km / h)
– Highest speed (0–99.9 km / h)
– Speed comparison
– Acceleration and deceleration
– Trip timer (max. 9:59:59) (countdown or forwards)
POLKUPY ÖRÄTIETOKONE
Käyttö- ja turvallisuusohjeet
BIKE COMPUTER
Operation and Safety Notes
CYKELDA T OR
Bruksanvisning och säkerhetsanvisningar
approx. 70 cm
87309_cri_Fahrradcomputer_GB-IE-FI.indd 1 04.02.13 09:48

Join the conversation about this product
Here you can share what you think about the Crivit IAN 87309 Cycling Computer. If you have a question, first carefully read the manual. Requesting a manual can be done by using our contact form.