
of time.
ltgs41_18pg052163_ib_final.indd 1 9/5/18 8:20 AM
SATINY SMOOTH
®
ALL-IN-ONE
shave & trim system
For your safety and continued enjoyment of this product,
always read the instruction book carefully before using.
MODEL LTGS41
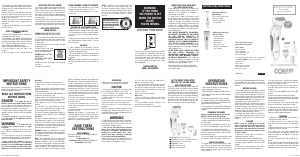
IMPORTANT SAFETY
INSTRUCTIONS
When using an electrical appliance, especially when
children are present, basic precautions should always
be taken, including the following:
READ ALL INSTRUCTIONS
BEFORE USING
DANGER – To reduce the risk of
death or serious injury from electrical shock:
1. Do not place or store appliance where it can
fall or be pulled into a tub or sink. Do not place or
drop appliance into water or other liquids.
2. Except when charging, always unplug this
appliance from the electrical outlet immediately
after using.
3. Always turn this appliance off before cleaning.
4. Do not reach for an appliance that has
fallen into water.
WARNING – To reduce the risk
of burns, fire, electrical shock, or injury
to persons:
1. This appliance should not be used by, on, or
near children or individuals with certain dis-
abilities.
2. Use this appliance only for its intended use
as described in this manual. Do not use attach-
ments not recommended by the manufacturer.
3. Never operate this appliance if it has a
damaged cord or plug, if it is not working
properly, if it has been dropped or damaged,
or has been dropped into water. Return the
appliance to a service center for examination
and repair.
4. Keep the cord away from heated surfaces.
5. Never drop or insert any object into any
opening.
6. Do not use outdoors or operate where aerosol
(spray) products are being used or where oxygen
is being administered.
7. Do not use this appliance with damaged or
broken foils, as injury may occur.
8. Always attach plug to appliance first, then to
outlet. To disconnect, turn all controls to OFF
position before removing plug from outlet.
9. This appliance is not a toy. Keep away from
children.
For connection to a power supply not in the
U.S.A., use an attachment plug adapter of the
proper configuration for the power outlet.
The included adapter automatically adjusts to
the input voltage. DO NOT USE A VOLTAGE
CONVERTER.
This device complies with Part 15 of the FCC
Rules. Operation is subject to the following two
conditions: (1) This device may not cause harm-
ful interference, and (2) this device must accept
any interference received, including interference
that may cause undesired operation.
WARNING: Changes or modification to this unit
not expressly approved by the party responsible
for compliance could void the user’s authority to
operate the equipment.
NOTE: This equipment has been tested and
found to comply with the limits for a Class B digi-
tal device, pursuant to Part 15 of the FCC Rules.
These limits are designed to provide reasonable
protection against harmful interference in a resi-
dential installation. This equipment generates,
uses and can radiate radio frequency energy
and, if not installed and used in accordance with
the instructions, may cause harmful interference
to radio communications. However, there is no
guarantee that the interference will not occur in
a particular installation. If this equipment does
cause harmful interference to radio or television
reception, which can be determined by turning
the equipment off and on, the user is encouraged
to try to correct the interference by one or more
of the following measures:
1. Reorient or relocate the receiving antenna.
2. Increase the separation between the equip-
ment and receiver.
3. Connect the equipment into an outlet on a
circuit different from that to which the receiver
is connected.
4. Consult the dealer or an experienced radio/TV
technician for help.
Caution: Any changes or modifications not
expressly approved by the Conair Corporation,
the manufacturer of this product and the party
responsible for compliance, could void the user’s
authority to operate the equipment.
SAVE THESE
INSTRUCTIONS
USER MANUAL
Before using the Class 2 Power Supply, read these
instructions carefully.
Use with adapter CA51
Rated input voltage: 100-240V AC, 50/60Hz 0.2A
Rated output: 6.0VDC 70mA
OPERATION
1. When not in use, unplug unit completely.
2. Unit will become warm during operation.
CAUTION
1. Ensure jack is plugged into the trimmer unit
before plugging the adapter into the outlet.
2. Do not operate any appliance that has
a damaged output cord or housing.
3. Always unplug the unit before cleaning or
when not in use.
4. This power unit is intended to be correctly
oriented in a vertical or floor-mount position.
5. Be sure voltage is in correct position before
plugging in.
Ensure the switch is off when charging. If fully
discharging the battery, and switch is still on,
red LED is off when plugging the adapter into the
outlet; unit will not charge.
WARNING
1. Women whose skin is sensitive to cosmetics
or easily irritated by shaving, or who suffer from
a skin allergy, should test one section of the leg
or arm before using the shaver.
2. The foils are thin and precisely finished
pieces. Do not press hard against the foils,
or drop foils. A warped or distorted foil will
produce poor shaving results. Also, a dam-
aged foil may cause skin injury. A damaged
foil should be replaced immediately.
3. When cleaning, use cold or warm water. Do not
use hot water, seawater, or cleaners, as they can
cause damage to the waterproof seals.
4. Do not leave the entire unit submerged in
water for a long period of time.
5. To prevent possible damage to the foils and
the cutter, women who use underarm deodor-
ant must thoroughly clean and air-dry the foil
and cutter after each use. Failure to do this may
result in corrosion.
6. Keep out of reach of children.
Before Use:
1. Test one small section of the leg or arm before
using any of the attachments on the rest of the
body.
2. If any sensitivity or allergic reactions occur,
discontinue use immediately.
3. Do not use on sensitive or irritated skin.
GET TO KNOW YOUR SATINY
SMOOTH
®
ALL-IN-ONE SHAVE
AND TRIM SYSTEM
The Conair Satiny Smooth
®
All-In-One Shave and
Trim System gives you today
’
s complete shaving
and trimming tools all in one. It has 3 inter-
changeable heads that are specially designed to
work quickly and leave you perfectly groomed.
The hypoallergenic foils on the shaving head help
to prevent skin irritation. The Satiny Smooth
®
All-In-One Shave and Trim System can be used
either wet or dry. Side handles include No-Slip
Grip
®
to allow precise trimming and handling.
5
4
3
2
1
Trimming heads included are:
1
Full-size foil shaver and trimmer head
2
Detail/eyebrow trimmer head
3
Adjustable comb
4
Bikini trimmer head
5
Eyebrow attachment
OPERATING
INSTRUCTIONS
1. Before using the trimmer for the first time,
charge continuously for 16 hours.
2. Switch OFF when charging; red LED will be on.
3. The adapter may become warm while charging.
This is normal.
4. Preserving the batteries: In order to maintain
the optimum capacity of the rechargeable batter-
ies, the trimmer should be recharged for 16 hours
approximately every 3 months.
5. For the purposes of recharging the battery, only
use the detachable supply unit provided with this
appliance.
CHANGING THE HEADS
Before changing the heads, be sure that the
ON/OFF switch is in the OFF position.
To remove the shaver head, gently twist counter-
clockwise and gently pull the head up and away
from the handle.
Be careful not to push against or hold onto the
foil. It is delicate and may be easily damaged.
To install the bikini or the eyebrow trimmer
head, reverse the removal process. Position the
head and gently twist clockwise until the attach-
ment snaps into place.
To remove the bikini or the eyebrow trimmer, follow
the same process for removing the shaver head.
USING THE SHAVER
The shaver head is designed to provide a clean,
close shave to your legs, arms, and underarms.
Take care with the foil, as it is very sensitive and
easily damaged. Always inspect it for damage
before you use it.
Never use a foil that is damaged, as this can result
in injury. Make sure your skin is clean and dry
before use. Do not use any lotions or oils before
shaving.
BEFORE SHAVING
1. Before wet shaving, you may wish to prepare
your legs and underarms with shaving cream or
soap. If a soapy lather is applied to the skin, the
shaver will glide smoothly over the skin and clean
away oil residue, while at the same time
remov-
ing hair. Caution: DO NOT use shaving gels, as
these products can clog your shaver foils.
2. When dry shaving, be certain that your skin is
clean. If you have sensitive skin, you may want to
apply talcum powder before and after you shave.
3. Clean your shaver after each use. This will
ensure the best performance. (Please refer to
“Rinsing the Attachment Head” section.)
4. Although the shaver, bikini and detail/eye-
brow trimmer heads are water resistant, do not
submerge it under water for extended periods
SHAVING
NOTE: If you are switching to an electric
shaver for the first time, it will take about 12
uses for your skin and hair to adjust to this
new method of removing hair. Do not evaluate
performance until you have allowed your skin
and hair to adjust.
1. Attach the shaver head as described in
“Changing the Heads” section.
2. Move the power switch to the ON position.
3. Hold the shaving foil against the skin, moving
the shaver gently against the direction of hair
growth.
4. Don’t push too hard against the skin, as this
will cause irritation and may damage the foil.
5. As your skin may be sensitive after shaving,
test your moisturizer on a small patch of skin and
wait to see if irritation occurs.
6. Cleaning: After each use you will need to
clean the shaver head to ensure continued per-
formance.
7. Move the power ON/OFF switch to the OFF
position.
8. Remove the shaver head from the handle.
9. Remove the foil head assembly from the shaver
head by pushing on the two side buttons and pulling
the foil away from the head.
10. The head may also be rinsed under water.
Be sure to allow both to air-dry before using.
To maintain the best cutting performance, be sure
to replace the foil head and cutter after every six
months of regular use. Contact Conair Customer
Service to order the replacement parts.
TRIMMING
1. Attach the trimming head as described in
“Changing the Heads” section.
2. To fully remove hair or to outline the bikini
area, use the trimmer without the attachment
comb.
3. When removing hair, gently move the blades
against the direction of growth.
4. To outline, place the blades perpendicular
to the skin surface and apply the blades to the
edge of the hair. Use the blades to create the
desired outline.
5. For the cleanest finish, follow up with the foil
shaver.
6. For cutting hair without completely removing
it, attach the 5-position comb to the head. Place
the comb on the cutting blades first, and then
snap down onto the back of the trimmer head.
7. Start with the longest setting, by moving the
comb switch away from the back of the trimmer.
8. Gently move the comb through the hair in the
direction of growth.
9. After you have done this with the longest set-
ting, if you want to make the hair shorter, move
to the next lowest position until the desired
length of hair is achieved.
10. After hair removal, run a comb or brush (not
included) through the hair to remove any cut,
loose hairs.
11. When you have finished, move the switch to
the OFF position.
USING THE DETAIL/EYEBROW
TRIMMER
1. Attach the trimming head as described in
“Changing the Heads” section.
2. This trimmer comes with two trimming blades.
The larger blade can be used to trim body hair and
eyebrows. The smaller blade is ideal for detailing.
3. To outline and shape your eyebrows, use the
trimmer without the attachment comb.
4. Move the power switch to the ON position.
5. Use the blades to define the edge of the
eyebrow.
6. Once the shape of your eyebrow has been
REPLACING THE FOILS FRAME
1. It is time to replace the foils when you find you
have to push harder on the shaver to get a close
shave, or if you have to go over your leg area more
often to get a smooth result, or if you experience
skin irritation. Replacement time will depend on
how often you use your shaver and how quickly
your hair grows.
2. When replacing the foils, press the foil frame
release buttons on both sides of the shaver head,
remove and then gently insert the new foil frame
into position, being careful not to push on the foils.
REPLACING THE CUTTER
(INNER BLADES)
CAUTION: NEVER REPLACE THE CUTTERS
WITHOUT REPLACING THE FOILS AS WELL.
1. To remove the shaver head from the unit, press
the release buttons on both sides of the foil frame
and then remove it from shaver head. The cutter
is now in view.
2. Hold both sides of the inner blades and pull
straight up (Fig. 1).
3. Firmly hold the new inner
blades and gently guide them
into the inner blade mount.
CAUTION: MAKE SURE YOU
DO NOT LOSE
THE SMALL SPRING UNDER
THE CUTTERS.
Fig. 1
4. Firmly press the inner blades until they snap
into place.
5. Replace the foil frame.
BIKINI TRIMMER COMB ATTACHMENT
1. Place the comb attachment on the bikini
trimmer head and press down (see Fig. 2).
2. Push up the comb attachment to release.
(see Fig. 3).
Fig. 2
Fig. 3
RINSING THE ATTACHMENT HEAD
1. Rinse the shaver cutter and foil frame, bikini
and detail/eyebrow trimmer heads under warm
or cold running water only; do not use hot water
(you can also use the cleaning brush which is
included).
2. Allow the shaver cutter and foil frame, bikini
and detail/eyebrow trimmer heads to air-dry
before replacing.
CAUTION
1. When shaking off excess water, hold the
main unit firmly to prevent releasing the head
assembly or dropping the unit.
2. Do not use a dryer or heater to dry the shaver.
This may result in a malfunction or damage to
the shaver.
NOTE: Never twist or wrap the cord around the
unit. Lay it flat with the cord coiled up when not
in use.
NOTE: The batteries are recyclable. At the end
of
their useful life, under various state and
local laws, it may be illegal to dispose of these
batteries into the municipal waste stream. Check
with your local solid waste officials for details
in your area for recycling options or proper
disposal.
CONTAINS NICKEL METAL
HYDRIDE BATTERIES. MUST
BE COLLECTED, RECYCLED
OR DISPOSED OF PROPERLY.
DO NOT DISPOSE OF IN THE
MUNICIPAL WASTE.
WARNING:
IF YOU THINK
THE POWER IS OFF
WHEN THE SWITCH
IS OFF,
YOU’RE WRONG.
KEEP AWAY FROM WATER
Everyone knows that electricity and water
are a dangerous combination. But did you
know that an electrical appliance is still
electrically live even if the switch is off?
If the plug is in, the power is on. So when
you are not using your appliances, keep
them unplugged.
ALWAYS UNPLUG
SMALL APPLIANCES
LIMITED TWO-YEAR WARRANTY
(US. AND CANADA ONLY)
Conair will repair or replace (at our option) your
unit free of charge for 24 months from the date of
purchase if the appliance is defective in
workmanship or materials.
To obtain service under this warranty, return
the defective product to the service center listed
below, together with your purchase receipt and
$3.00 for postage and handling. California
residents need only provide proof of purchase and
should call 1-800-3-CONAIR for shipping
instructions. In the absence of a purchase receipt,
the warranty period shall be 24 months from the
date of manufacture.
ANY IMPLIED WARRANTIES, OBLIGATIONS,
OR LIABILITIES, INCLUDING BUT NOT LIMITED
TO THE IMPLIED WARRANTY OF
MERCHANTABILITY AND FITNESS FOR A
PARTICULAR PURPOSE, SHALL BE LIMITED IN
DURATION TO THE 24-MONTH DURATION OF
THIS WRITTEN, LIMITED WARRANTY. Some
states do not allow limitations on how long an
implied warranty lasts, so the above limitations
may not apply to you.
IN NO EVENT SHALL CONAIR BE LIABLE
FOR ANY SPECIAL, INCIDENTAL, OR
CONSEQUENTIAL DAMAGES FOR BREACH OF
THIS OR ANY OTHER WARRANTY, EXPRESS
OR IMPLIED, WHATSOEVER. Some states do
not allow the exclusion or limitation of special,
incidental, or consequential damages, so the
above limitation may not apply to you.
This warranty gives you specific legal rights,
and you may also have other rights, which vary
from state to state.
EXCITING ITEMS FROM CONAIR
BT2G Battery-Operated
Bikini Trimmer
• Safe on all sensitive areas
• Nick-free cutting
• Requires AA battery
(not included)
LWD1P Battery-Operated
Twin Foil Shaver
• 2 pivoting blades
• Pop-up trimmer
• Rinsable head
• Skin friendly
• Safe on all areas
• Requires 2 AAA batteries
(not included)
Please register this product at
www.conair.com/registration
Service Center
Conair Corporation
Service Department
7475 N. Glen Harbor Blvd.
Glendale, AZ 85307
For shaving tips and information on Conair appliances,
call 1-800-3-CONAIR or visit us on the web at
www.conair.com
Made in China
©2018 Conair Corporation
7475 N. Glen Harbor Blvd.
Glendale, AZ 85307
18PG052163 IB-15621


Join the conversation about this product
Here you can share what you think about the Conair LTGS41 Shaver. If you have a question, first carefully read the manual. Requesting a manual can be done by using our contact form.