B
CATEYE VELO5
CATEYE VELO8
CYCLOCOMPUTER
Model CC-VL510/CC-VL810
®
ENG
U.S. Pat. Nos. 4642606, 5236759 and Pat. Pending
Copyright©2011 CATEYE Co., Ltd.
CCVL51/81-110930 066600560
4
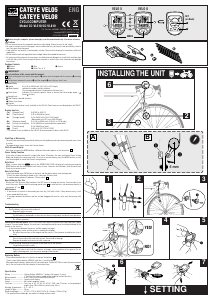
INSTALLING THE UNIT
2
3
6
3
6
5
3
1 2 3
3
4
3
SET
(on Back)
F
VELO 8VELO 5
MODE
G
4
YES!
NO!
5
1
1
5
6 7
SETTING
5
5 mm
A
Before using the computer, please thoroughly read this manual and keep it for future reference.
Caution
• Do not concentrate on the computer operations while riding. Always be sure to ride safety.
• Be sure to securely mount the magnet, sensor and bracket on your bicycle, and periodically check to
see if any parts have loosened.
• Used batteries are harmful if swallowed by mistake. They must be disposed in accordance with local
regulations.
• Do not leave the main unit exposed to direct sunlight. Never disassemble the main unit.
• For cleaning of the main unit or accessories, use diluted neutral detergent on a soft cloth, and then wipe
it off with a dry cloth. Do not use paint thinner, benzine or alcohol since such chemicals may damage
the surface.
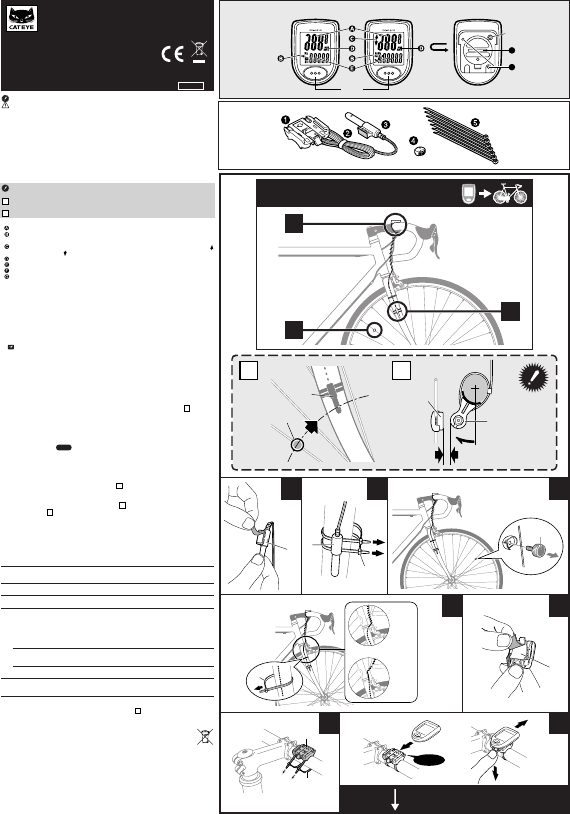
Package Contents
1 Bracket 2 Wire 3 Sensor
4 Magnet 5 Nylon Ties (x 7)
IMPORTANT!
Correct positions of the sensor and the magnet:
A
When rotating the front wheel, the magnet's 4 center must be aligned with the sensor's 3 marking
line.
B
The distance between the sensor 3 and the magnet 4 must be less than 5 mm.
Name of Parts
Speed 0.0 (4.0) to 299.9 km/h [0.0 (3.0) to 185.0 mph]
Mode Symbol Indicates the mode currently selected.
(The corresponding value is indicated on the lower line.)
Pace Arrow* Indicates if the current speed is faster or slower than the average speed. (
Faster Slower)
Speed Scale
Sub Display (selected function)
Battery Case Cover
Contact
*The Pace Arrow feature is only available on the VELO8. Pace Arrows are not displayed on the VELO5.
Display function
• Tm* [Elapsed Time] 0:00'00" to 9:59'59"
• Dst [Trip Distance] 0.00 to 999.99 km [mile]
• Av* [Average Speed] 0.0 to 299.9 km/h [0.0 to 185.0 mph]
(Measurable up to 27 hrs or 999.99 km/h)
• Mx [Maximum Speed] 0.0 (4.0) to 299.9 km/h [0.0(3.0) to 185.0 mph]
• Cal* [Calorie Consumption] 0.0 to 9999.9 kcal (estimated from speed data)
• Odo [Total Distance] 0.0 to 9999.9 km [mile]
• [Clock] 0:00' to 23:59' [1:00'to 12:59']
* This feature is only available on the VELO8. No measurement is done on the VELO5.
Start/Stop of Measuring
The unit starts measuring automatically when you start pedaling, and stops measuring when your come
to a stop.
The upper display always shows the Current Speed.
Shift of Lower Display
Each time you press the MODE button, a different data value appears on the lower line.
e
Power Saving Function
If the main unit does not receive a signal after about 10 minutes, the main unit enters Power Saving
Mode and displays the clock count only. To re turn to normal display, press the MODE button or start
your bicycle again to cancel the Power Saving function.
Data Reset
When a screen with the
Reset
mark in the OPERATION FLOW is displayed, continue pressing the
MODE button and the measured data will return to zero. However, the Odometer (total distance) and
Clock do not return to zero.
How to Set Clock
In the clock mode, press SET button on the back, and the display enters clock setting mode.
*If Km/h has been selected for speed scale, it becomes 24-hour clock.
If mph has been selected, it becomes 12-hour clock.
f
How to Change Tire Size
Display the Total Distance (Odo) and press the SET button to change the tire size. You can select a tire
size in two ways: Either select from among preset sizes
c
or enter the tire’s circumference directly in
increments of 1 cm.
d
Maintenance
• If the contact of the unit or the bracket gets wet, dry it off with a cloth. If they become rusty, it will
cause speed detection error.
• If the gaps between the buttons and the unit get clogged with mud or sand, wash them away with
water.
Troubleshooting
No display.
Has the battery in the main unit run down?
Replace it with a new one.
The main unit may still have a charge.
Put the battery in backwards to short the unit then install properly and do all clear operation.
Incorrect data appears.
Do all clear operation.
Current speed does not appear. (First, short-circuit the contact of the main unit a few times with a piece
of metal. If current speed appears, the main unit is working fine and the cause should be attributed to the
bracket or the sensor.)
Is the clearance between the sensor and the magnet too large?
Are the magnet's center and the sensor's marking line aligned?
Re-adjust the positions of the magnet and the sensor. (The clearance should be less than 5
mm.)
Is the cord broken?
Even if the outside of the cord looks normal, there could be damage.
Replace the bracket and sensor set with a new one.
Is there anything sticking on the contact of the main unit or the bracket?
Clean the contact with a cloth.
Current speed disappears when using in the rain.
Wipe any water or dirt from the contacts and apply a water repellent silicon grease. Do not
apply standard grease, as it may cause damage to the bracket.
Replacing Battery
If the screen becomes dim, it is the time to replace the battery.
g
*Insert a new lithium battery (CR2032) with the (+) mark facing up.
After replacing the battery, perform the all-clear operation. Follow SETTING to select the measurement
unit & tire size and set the clock display to the current time.
Specification
Battery --------------------- Lithium Battery CR2032 x 1 (battery life: approx. 3 years)
(*The life of the factory-loaded battery might be shorter than this.)
Microcomputer ----------- 4-bit 1-chip (Crystal controlled oscillator)
Display --------------------- Liquid crystal display
Sensor --------------------- No-contact magnetic sensor
Tire Sizes ------------------ Tire sizes of 16, 18, 20, 22, 24, 26, 700C, and 27 inches, or tire peripheral
lengths from 100 to 299 cm (Initial value: 26 in.)
Working Temperature --- 0 °C – 40 ° C
Length of Wire ------------ 70 cm
Dimension/Weight ------- 2-1/16" x 1-1/2" x 45/64" (52.5 x 38 x 18 mm) / 0.95 oz (27 g)
* The specifications and design are subject to change without notice.


Join the conversation about this product
Here you can share what you think about the Cateye CC-VL810 Velo 8 Cycling Computer. If you have a question, first carefully read the manual. Requesting a manual can be done by using our contact form.
reply | This was helpful (1) (Translated by Google)