
2012 IQ400 Computer
Setup and Owners Manual - 11/11
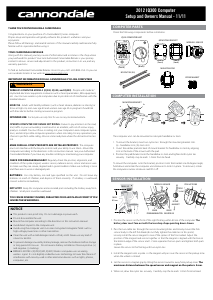
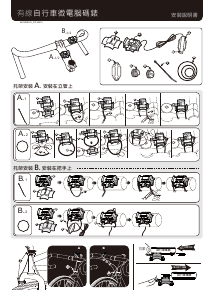
2. Pass the two cable ties through the sensor mounting holes and loosely mount the
sensor body to the non-drive side chainstay (do not fully tighten the cable ties at this
point). Install the sensor stabilizing pad between the chainstay and sensor.
3. Secure the sensor to the non-drive side chainstay with 2 nylon ties. Loosely install the
sensor magnet to one of the spokes of the rear wheel. Make sure the silver side of the
magnet faces toward the sensor arm.
Adjust the position of the magnet, sensor arm and sensor together so that the magnet
passes by the full length of the sensor arm and 1-2 mm separates the magnet and
sensor arm.
4. Loosely mount the Cadence Magnet to the inside of the crank arm using 1 of the nylon
ties. Make sure the word “Sensor” faces toward the Cadence Sensor pin and a small
piece of stabilizing pad is installed between the Cadence Magnet and the crank arm.
IMPORTANT: Proper adjustment of the clearances between magnets and sensors must
be accurate for proper computer function. There are multiple ways to make accurate
adjustments and requires care when setting up the sensors.
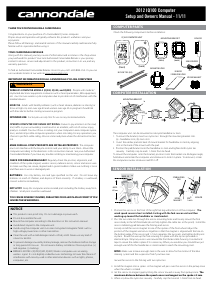
5. Set the Speed Sensor-to-magnet and Cadence Sensor-to-magnet gaps by tilting the
sensor toward or away from pickup zone. Adjust the position of the Cadence Sensor
pin and Speed Sensor arm as needed - make sure to loosen or tighten the screw on the
front edge of the sensor body when adjusting the Cadence Sensor pin. The maximum
distance between the speed sensor and magnet on the spoke is 5 mm. The maximum
distance between the cadence sensor and magnet on the crank arm is 5mm.
6. When set, draw the nylon ties tight but do NOT fully tighten. This will allow for minor
adjustments after the computer setup is complete.
SETTING THE CLOCK CLK
1. Press FUNCTION until the “CLK” function shows.
2. Press and hold SET for >3 seconds to begin programming.
3. Press SET to change to “12H” or “24H” hour mode.
4. Press the FUNCTION to move the cursor to the hour eld
5. Press SET hour.
6. Repeat steps 4 and 5 to set Minutes and Seconds.
7. Press and hold the FUNCTION button for 3 seconds to exit programming.
GENERAL NOTES FOR PROGRAMMING ALL FUNCTIONS:
• Press and hold SET for 3 seconds to begin programming a function.
• Press the SET to change the value of a selected eld. Press/hold SET to change
value rapidly.
• Press the FUNCTION button to move the cursor to the next eld.
• Press and hold the FUNCTION button for 3 seconds to exit programming.
To begin using the computer, simply press the FUNCTION button. Following installation,
the computer is activated automatically by a rotating wheel.
There are 2 power saving modes - 50% savings if no movement after 5 minutes, 100%
power savings after 30 minutes.
Press the SET button to exit the power saving modes prior to using the computer.
Press the FUNCTION button, to switch the computer through the following functions:
“CLK” – Clock feature, in 12/24 hr format
“TM” – Time ridden for 1 ride
“AVS” – Average speed for 1 ride
“MXS” – Maximum speed for 1 ride
“A. CAD” - Average cadence per minute for 1 ride
“M. CAD” - Maximum cadence for 1 ride
“DST” - Distance ridden for 1 ride
“ODO” – Total miles ridden for all rides
“KCAL” – Calories burned (estimate) for 1 ride
“DAILY” – Distance ridden in the past 24 hours
“
SCAN
”
– Computer display scans all functions. Press the FUNCTION button to stop
scanning.
To turn on the backlight, press and release the SET button. The backlight will stay
on for three (3) seconds.
“TM, AVS, MXS, DST, and KCAL“ are recorded automatically as soon as the wheel moves.
A CAD and M CAD are automatically recorded as soon as the crank moves. Recording stops
if the wheel stops. Cadence recording stops if the crank stops. To clear this information,
press and hold the SET button in the “TM” mode.
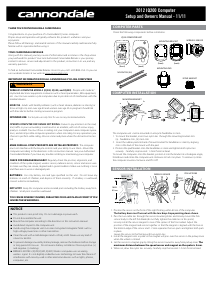
MAIN DISPLAY AND FUNCTIONS
CURRENT SPEED
SPEED SCALE
SUB-DISPLAY
MODE
SET Button
(back of unit)
FUNCTION Button
FUNCTIONS DISPLAY
C
R
2
0
3
2
CADENCE
MOTION SIGNAL
**This button also,
activates the display
backlighting.
SETTING CALORIES BURNED KCAL
This computer can estimate calories burned while riding. The estimate is based on weight,
gender, time ridden and average speed. IMPORTANT: The estimate is truly an estimate.
Actual calories burned will vary depending on many variables the computer does not
calculate such as heart rate.
1. Press FUNCTION until the “KCAL” displays.
2 Press and hold SET for >3 seconds to begin programming.
3. Press SET to select gender “MALE” or “FEMALE”.
4. Press FUNCTION to store gender.
5. Press SET to change weight unit “Kg” or “Lb”.
6. Press FUNCTION to begin entering your weight in unit selected.
7. Press or hold Set to change the weight. Range: 0 ~ 150 Kg, 0-330 Lb.
8. Press and hold the Function for 3 seconds to exit programming.
RESETTING THE ODOMETER ODO
If the battery is replaced, it is possible to update the odometer to the mileage on your bike
after replacing the battery.
1. Press FUNCTION until the “ODO” displays.
2. Press and hold SET for >3 seconds to begin programming.
3. Press FUNCTION until “00000” (ve zeros) and “ODO” appears on the screen
4. Press SET to change the appropriate numbers. Press FUNCTION to change cursor
position.
5. Repeat step 4 until the odometer is set.
6. Press and hold FUNCTION for 3 seconds to exit programming.
7. Verify the computer shows speed and cadence. If not, you may have to complete the
Final Set Up steps shown in these instructions.


Join the conversation about this product
Here you can share what you think about the Cannondale IQ400 Cycling Computer. If you have a question, first carefully read the manual. Requesting a manual can be done by using our contact form.
reply | This was helpful (0) (Translated by Google)
reply | This was helpful (0) (Translated by Google)
reply | This was helpful (0) (Translated by Google)