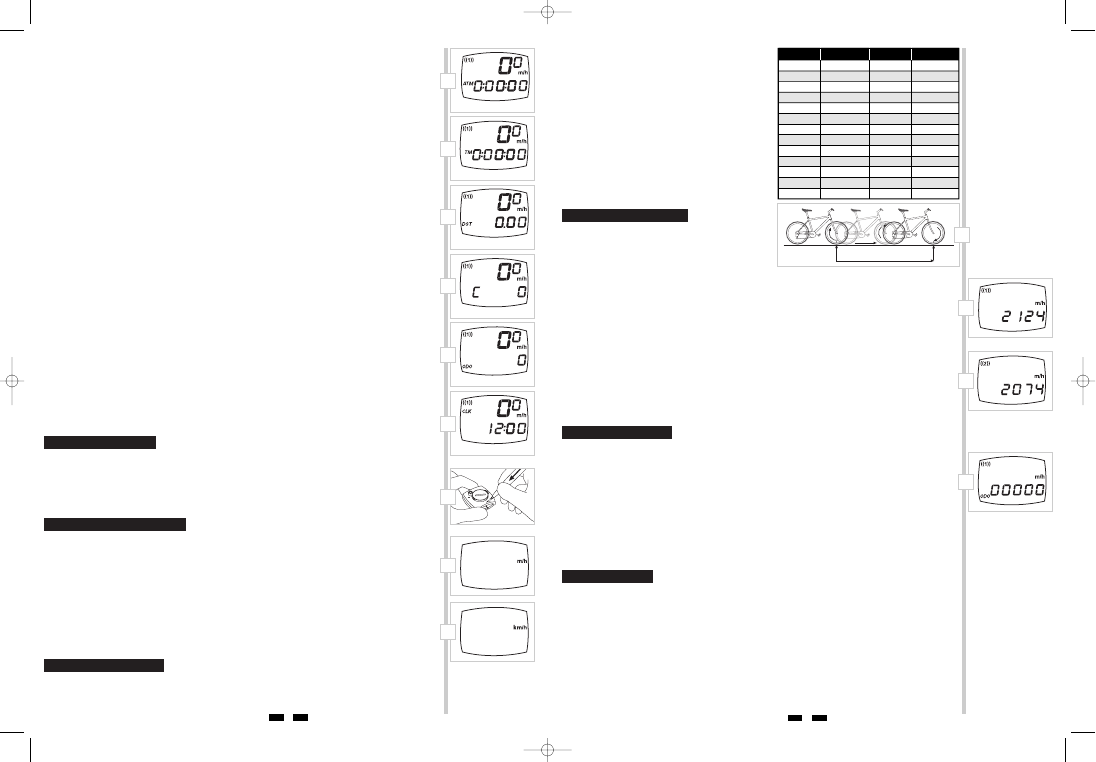
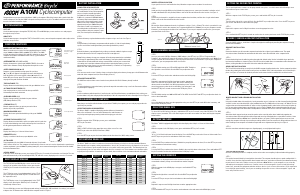
AUTOMATIC RIDE TIMER (ATM) (Figure 4)
Auto start/stop timer records actual ride time up to 9:59:59. Activated by rear wheel movement.
To reset ATM to zero, advance to the ATM screen and press and hold the LEFT button for 3 seconds.
Note: AVS, MXS and DST will also be reset to zero.
To select ATM or TM, advance to the ATM/TM screen. Press and hold BOTH buttons until ‘ATM’ or ‘TM’ flashes. Press the RIGHT button to
select ATM or TM. Press the LEFT button to confirm your selection.
STOPWATCH (TM) (Figure 5)
Manual stopwatch allows you to time your entire ride or portions of your ride, up to 9:59:59.
Press the LEFT button to start and stop the stopwatch.
To reset TM to zero, advance to the TM screen and press and hold the LEFT button for 3 seconds.
Note: AVS, MXS and DST will also be reset to zero.
To select TM or ATM, advance to the ATM/TM screen. Press and hold BOTH buttons until ‘ATM’ or ‘TM’ flashes. Press the RIGHT button to
select TM or ATM. Press the LEFT button to confirm your selection
TRIP DISTANCE (DST) (Figure 6)
Displays distance traveled during current ride, up to 999.99 miles or kilometers.
To reset DST to zero, advance to the DST screen and press and hold the LEFT button for 3 seconds.
Note: AVS, MXS and ATM (or TM) will also be reset to zero.
CADENCE (C) (Figure 7)
Displays crank revolutions per minute (RPM) from 30 to 240.
ODOMETER (ODO) (Figure 8)
Displays cumulative, combined ride distance for wheel settings ((1)) and ((2)) up to 99,999 miles or kilometers.
To program the ODO value see “Setting the Odometer.”
To reset the ODO to zero, depress the ‘AC’ button on the underside of the computer head. See “Reset Display Screens”. Note: This will reset
ALL display screens and ALL programmed settings (including CLK and wheel size setting).
CLOCK (CLK) (Figure 9)
Displays time of day in a 12 hour or 24 hour format.
To view the clock, press and hold the RIGHT button for 3 seconds in any display screen.
To select clock format and set the time, see “Setting the Clock.”
AUTO SLEEP
To prolong battery life, the A08C will automatically enter “sleep” mode after 5 minutes of non-use. The computer will automatically restart
when it receives input from the speed sensor, or when any button is pressed.
RESET DISPLAY SCREENS
The AVS, MXS, ATM (or TM) and DST display screens can be reset simultaneously. In the AVS, ATM (or TM) or DST display screens, press
and hold the LEFT button for 3 seconds to reset all four display screens to zero.
The MXS display screen can also be reset separately. In the MXS screen, press and hold the LEFT button for 3 seconds to reset only MXS to zero.
To reset all display screens to zero AND reset all programmed settings (including CLK, ODO and wheel size settings), use a pencil to
depress the “AC” button on the underside of the computer head. See Figure 10.
PROGRAMMING THE COMPUTER
Before using your Axiom
®
A08C cyclocomputer, you must program the unit specifically for your bike.
SELECTING MILES OR KILOMETERS (Figure 11A & 11B)
The Axiom
®
A08C is capable of displaying speed and distance information in either miles or kilometers. You can switch between miles and
kilometers at any time by entering the programming mode and changing your selection.
STEP 1
With the computer in the ODO display screen, press and hold BOTH buttons for 3 seconds.
STEP 2
“m/h” or “km/h” will flash on the right side of the screen. Press the RIGHT button to select miles (m/h) or kilometers (km/h).
STEP 3
Press the LEFT button to confirm your selection and return to the ODO display screen.
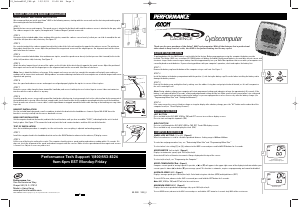
DETERMINING WHEEL SIZE
The Axiom
®
A08C uses wheel circumference (measured in millimeters) to calculate speed and distance. Note that while your computer can
be programmed to +/-1mm for total accuracy, discrepancies of as much as 50mm will not have a significant effect on the accuracy of the unit
for most normal rides. The following chart lists the programming sizes for some of the most popular tire sizes currently in use. These numbers
are estimations which may not precisely match the circumference of your wheel, due to variations in tire size between brands and models.
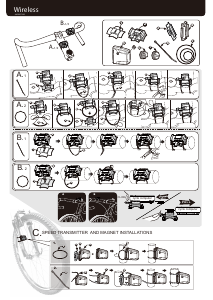
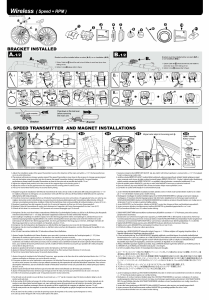
WHEEL SIZE CALCULATION
If your specific tire size is not listed in the chart, follow these steps
to measure wheel circumference.
STEP 1
Stand your bicycle upright. With your tire inflated to its proper
pressure, rotate your front wheel so that the valve is located at the
bottom (6 o’clock position). Make a mark on the floor to indicate the
valve location. See Figure 12.
STEP 2
Roll the bicycle forward in a straight line for one complete wheel
revolution, until the valve is again at the bottom. Make a mark on
the floor to indicate the valve location.
STEP 3
Measure the distance between the marks in millimeters (1 inch =
25.4mm). This value is your wheel circumference. Enter this value
in the computer (see “Programming Wheel Size”).
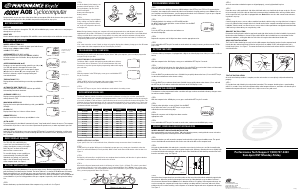
PROGRAMMING WHEEL SIZE
The default wheel size setting for wheel size ((1)) is 2124mm. The
default wheel size setting for wheel size ((2)) is 2074mm. After
determining your wheel size as described above, enter the value in
the computer.
WHEEL SIZE ((1)) (Figure 13A)
STEP 1
Advance to the ODO display screen. Press and hold the LEFT button for 3 seconds to access the wheel size programming screen. The digit at
the right of the screen will flash. Use the RIGHT button to adjust the value.
STEP 2
Press the LEFT button to confirm the value and advance to the next flashing digit.
STEP 3
Repeat this process until all digits have been set to the appropriate values.
STEP 4
Press the LEFT button to confirm the wheel size setting and advance to the odometer (ODO) programming screen.
WHEEL SIZE ((2)) (Figure 13B)
STEP 1
Advance to the ODO display screen. Press and hold the LEFT button for 3 seconds to access the first wheel size screen. Then press and hold
the LEFT button for 3 more seconds to access the second wheel size screen. The digit at the right of the screen will flash. Use the RIGHT but-
ton to adjust the value. Continue with STEP 2, above.
SETTING THE ODOMETER
The A08C odometer can be programmed so that cumulative mileage can be restored after a battery change or transferred from another computer.
STEP 1
Once you’ve entered the wheel size value and pressed the LEFT button (see STEP 4 of “Programming Wheel Size”), the computer will auto-
matically advance to the odometer programming screen. See Figure 14.
STEP 2
The digit at the right of the screen will flash. Use the RIGHT button to adjust the value. Press the LEFT button to confirm the value and
advance to the next flashing digit.
STEP 3
Repeat this process until all digits have been set to the appropriate values.
STEP 4
Once the last digit has been set, press the LEFT button to return to the ODO display screen.
SETTING THE CLOCK
To access the CLK screen, press and hold the RIGHT button for 3 seconds in any display screen. The Axiom
®
A08C cyclocomputer is equipped
with a digital clock that displays time of day in a 12 hour or 24 hour format.
STEP 1
With the computer in the CLK display screen, press and hold the LEFT button for 3 seconds.
STEP 2
“24” or “12” will flash in the lower line of the display. Press the RIGHT button to select the 12 hour or 24 hour mode. Press the LEFT button to
confirm your selection and advance to the hours setting.
STEP 3
Press the RIGHT button to set the hours. Press the LEFT button to advance to the minutes setting.
STEP 4
Press the RIGHT button (or press and hold) to set the minutes. Once the minutes are set, press the LEFT button to confirm the setting and
return to the CLK display screen.


Join the conversation about this product
Here you can share what you think about the Axiom A08C Cycling Computer. If you have a question, first carefully read the manual. Requesting a manual can be done by using our contact form.